Metal Roof 2/12 Pitch Installation: Essential Best Practices for Lasting Results
The humble roof pitch, often overlooked, plays a monumental role in the performance and longevity of any roofing system. When we talk about a 2/12 pitch, we’re referring to a roof that rises 2 inches vertically for every 12 inches it extends horizontally. This shallow slope presents unique challenges and opportunities, particularly when paired with the robust, long-lasting qualities of metal roofing. Installing a metal roof on a 2/12 pitch correctly isn’t just about covering a structure; it’s about meticulously engineering a watertight, durable shield against the elements that will perform reliably for decades. This comprehensive guide will delve into the essential best practices required to achieve lasting results for your metal roof 2/12 pitch installation project.
Understanding the 2/12 Pitch and its Unique Challenges
A 2/12 pitch falls into the "low-slope" category for many roofing materials. While metal roofing is exceptionally well-suited for low-slope applications compared to asphalt shingles (which typically require a minimum 4/12 pitch), the 2/12 pitch still demands specialized attention. The primary challenge stems from slower water drainage. On steeper roofs, gravity rapidly sheds water and debris. On a 2/12 pitch, water moves more slowly, increasing the risk of:
- Capillary Action: Water can be drawn upwards into seams or laps against gravity due to surface tension.
- Ponding: While metal roofs are designed to prevent ponding, slight imperfections or heavy debris can create areas where water lingers, testing the system’s watertightness.
- Snow and Ice Dams: Low slopes are more susceptible to ice dam formation at the eaves, which can force meltwater back up under the roofing material.
- Debris Accumulation: Leaves, twigs, and other debris are more likely to settle and remain on a low-slope roof, potentially holding moisture and accelerating wear.
Therefore, "standard" metal roofing practices, while excellent for steeper pitches, must be adapted and enhanced to mitigate these risks on a 2/12 slope.
Choosing the Right Metal Roofing System for Low Pitches
The selection of the appropriate metal roofing system is paramount for a 2/12 pitch. Not all metal roof types are suitable for such shallow slopes.
Panel Types:
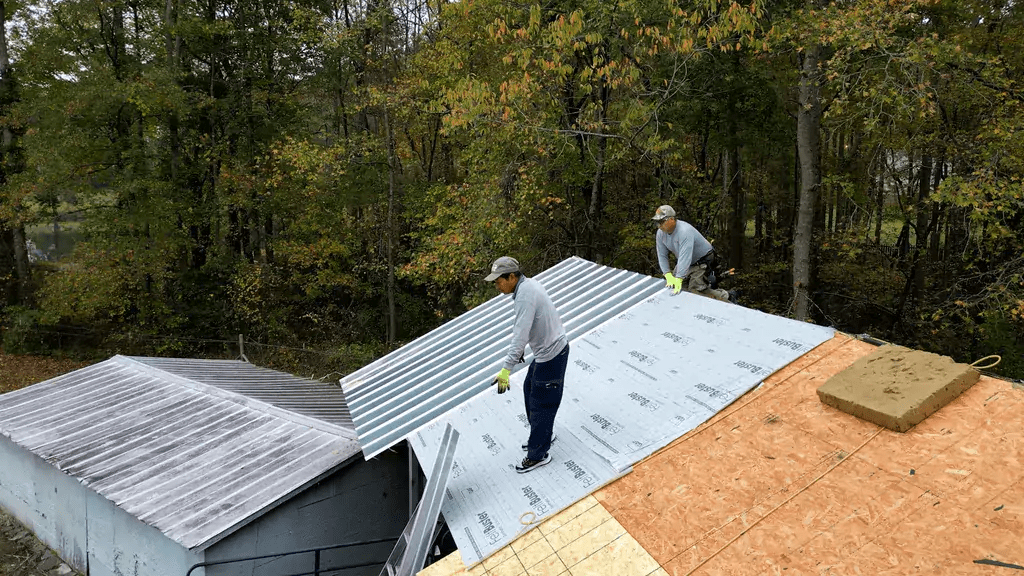
- Standing Seam Metal Roofs (Recommended): This is the gold standard for low-pitch applications. Standing seam panels feature concealed fasteners and raised seams that mechanically lock or snap together, preventing water ingress through fastener holes and minimizing the risk of capillary action.
- Mechanical Lock: Requires specialized seaming tools to crimp the seams, offering the highest level of watertightness, often rated for pitches as low as 1/2:12.
- Snap-Lock: Easier to install, where panels simply snap together. While excellent, some manufacturers recommend a slightly higher minimum pitch (e.g., 1:12 or 2:12) for snap-lock systems compared to mechanical lock.
- Screw-Down (Exposed Fastener) Metal Roofs (Generally Discouraged): While more economical, screw-down panels rely on exposed fasteners with rubber washers for sealing. On a 2/12 pitch, the slower water drainage and increased potential for ponding or debris accumulation significantly heighten the risk of water penetration as these washers degrade over time. If used, only specific low-slope rated profiles with enhanced sealing systems should be considered, and even then, meticulous installation and ongoing maintenance are critical.
Material and Gauge:
- Materials: Steel (Galvalume or Galvanized for corrosion resistance), Aluminum (lighter, excellent for coastal areas), Copper, and Zinc are common. For most residential and commercial applications, coated steel or aluminum are popular choices.
- Gauge: Opt for a thicker gauge (e.g., 24-gauge steel or .032" aluminum) for increased panel rigidity, better wind resistance, and enhanced durability against foot traffic or hail.
Coatings:
- High-performance coatings like Kynar 500® (PVDF) are essential for UV resistance, color retention, and longevity, ensuring the roof maintains its aesthetic and protective qualities for decades.
Practical Advice: Prioritize a high-quality standing seam system from a reputable manufacturer for any 2/12 pitch installation. The initial investment is justified by superior performance and longevity.
Critical Underlayment and Substrate Preparation
The underlayment acts as a crucial secondary barrier, protecting the roof deck from moisture that might bypass the primary metal roof panels. For a 2/12 pitch, this layer is absolutely non-negotiable and requires a robust approach.
Underlayment Type:
- High-Temperature Self-Adhering Underlayment (Ice and Water Shield): This is the only acceptable choice for 2/12 pitches. Unlike traditional felt paper, self-adhering membranes (often butyl or asphalt-based) create a watertight seal directly to the roof deck, sealing around fasteners and providing an impermeable barrier. Its high-temperature rating prevents melting and flowing under the intense heat that can build up under metal roofing.
Application Best Practices:
- Full Deck Coverage: For a 2/12 pitch, the self-adhering underlayment should cover the entire roof deck, not just the eaves and valleys. This provides a continuous, redundant layer of protection.
- Proper Overlapping: Apply the underlayment starting from the eaves, overlapping subsequent courses according to manufacturer specifications (typically 3-6 inches). Ensure a tight, wrinkle-free application, pressing firmly to activate the adhesive.
- Sealed Penetrations: All roof penetrations (vents, pipes, skylights) must have the underlayment carefully cut and sealed around them, often with additional layers or sealant.
Substrate Preparation:
- Clean and Dry Deck: The roof deck (plywood or OSB) must be clean, dry, and free of debris, old fasteners, or protruding elements before underlayment application.
- Proper Fastening: Ensure the deck itself is securely fastened to the rafters or trusses, as a stable substrate is fundamental to the entire system’s integrity.
- Flat Surface: Any significant irregularities in the deck can telegraph through the metal panels, affecting aesthetics and potentially creating stress points.
Don’t skimp on underlayment: This layer is your ultimate defense against leaks on a low-slope metal roof. It’s often the difference between a lasting roof and a problematic one.
Flashing and Sealing Techniques for Watertightness
Flashing is where most roof leaks occur, especially on low-pitch roofs. Meticulous attention to detail in flashing and sealing is paramount.
Key Flashing Areas:
- Eaves (Drip Edge): Install a continuous drip edge along the eaves under the underlayment and over the fascia to direct water away from the roof edge and into gutters.
- Rakes (Gable Ends): Rake trim should be installed over the underlayment and under the metal panels, providing a clean edge and protecting the side of the roof deck.
- Valleys: Use a pre-formed W-style valley flashing or an open valley design, integrated meticulously with the underlayment. Ensure sufficient width and a robust sealant application beneath the flashing. Avoid "closed" valleys where panels meet directly, as these are highly prone to leaks on low pitches.
- Penetrations (Pipes, Vents, Skylights, Chimneys): These are critical points.
- Custom Fabrication: Often, custom-fabricated flashing boots or caps are required, especially for chimneys and skylights.
- Step and Counter-Flashing: For walls or chimneys, employ step flashing integrated with the roof panels, protected by counter-flashing that is cut into the wall and sealed.
- Sealants: Use high-quality, non-curing butyl sealants or specialized metal roofing sealants (e.g., urethane or silicone compatible with the metal). Apply sealants judiciously and strategically within flashing components, ensuring full coverage without creating dams.
Seam Sealants (for Standing Seam):
- While standing seam roofs inherently offer excellent watertightness, some systems, especially snap-lock or those with specific architectural requirements, may incorporate butyl tape or a bead of sealant within the seam during installation. Always follow manufacturer guidelines.
- For end laps (where two panels meet end-to-end), robust sealant application and proper overlapping are crucial. Minimize end laps by ordering longer panels where feasible.
Key Consideration: All flashing must be installed in a shingle-fashion – meaning upper components shed water over lower components – to ensure gravity assists in water diversion.
Panel Installation Specifics for 2/12 Pitch
Even with the right materials and preparation, improper panel installation can compromise the entire system.
- Starting Square: Begin installation by ensuring the first panel is perfectly square to the eaves and rake. Any deviation here will compound across the entire roof.
- Panel Alignment: Maintain straight lines and consistent panel spacing throughout the installation. Use string lines or laser levels for accuracy.
- Concealed Fasteners (Standing Seam): Utilize the manufacturer-specified clips and fasteners for standing seam panels. These clips allow for thermal movement (expansion and contraction) of the metal panels, preventing buckling and stress on the seams.
- Seaming Process:
- Mechanical Lock: Use the appropriate electric or manual seaming tools to crimp the seams, creating a watertight, structural connection. Ensure full engagement of the seam.
- Snap-Lock: Verify that each panel fully "snaps" into place, ensuring the interlock is complete along the entire length.
- Thermal Movement: Metal expands and contracts significantly with temperature changes. Standing seam clips are designed to accommodate this. Avoid "over-fastening" or rigidly fixing panels at multiple points, as this can lead to oil canning (visible distortion) or even fastener failure.
- Foot Traffic: Limit foot traffic on the installed panels. If necessary, use soft-soled shoes and walk carefully on the ribs or designated areas to avoid damaging the finish or deforming the panels.
How-to Guide Tip: Always refer to the specific installation manual provided by the metal panel manufacturer. Variations exist between systems, and adhering to their instructions is vital for warranty validity and optimal performance.
Ventilation and Condensation Management
Proper ventilation is crucial for any roof, but on a low-pitch metal roof, it takes on added importance to prevent condensation issues.
- The Problem: Without adequate airflow, warm, moist air from the building’s interior can rise into the attic space. When it meets the cooler underside of the metal roof, condensation forms. This moisture can lead to mold, mildew, rot in the roof deck, degraded insulation, and even corrosion of the metal panels from below.
- Balanced Ventilation: Aim for a balanced ventilation system, meaning equal amounts of intake (low on the roof, typically at the soffits) and exhaust (high on the roof, typically at the ridge or through strategically placed vents).
- Vent Types:
- Soffit Vents: Provide intake air. Ensure they are not blocked by insulation.
- Ridge Vents: For a 2/12 pitch, traditional continuous ridge vents may be less effective or aesthetically challenging. Low-profile, baffled ridge vents designed for low slopes or "box" vents specifically designed for low-pitch applications might be necessary.
- Gable Vents: Can be used for exhaust if a ridge vent isn’t feasible, but a continuous flow from eave to ridge is generally preferred.
- Airflow Pathway: Ensure a clear, unobstructed pathway for air to flow from the intake to the exhaust vents. Use baffles at the eaves to prevent insulation from blocking airflow.
Tip: Consult local building codes for minimum ventilation requirements in your area. A well-ventilated attic space is key to a healthy and long-lasting roof system.
Maintenance and Longevity Tips
Even with the best installation, a metal roof on a 2/12 pitch benefits from periodic maintenance to ensure its extended lifespan.
- Regular Inspections: Periodically (e.g., annually or semi-annually, especially after severe weather) inspect the roof from the ground or with a drone. Look for:
- Accumulated debris (leaves, branches) in valleys, gutters, or on the flat surfaces.
- Damaged or loose flashing around penetrations.
- Compromised sealants.
- Signs of "oil canning" or panel deformation.
- Gutter and Valley Cleaning: Keep gutters and valleys clear of debris to ensure unimpeded water flow. Blockages can lead to water backup and potential leaks.
- Sealant Checks: Over time, even high-quality sealants can degrade. Inspect them and reapply as needed.
- Addressing Ice Dams: While proper insulation and ventilation are the primary defense, in extreme climates, additional measures like heat cables may be considered, but these should be installed by professionals to avoid damaging the roof.
Concluding Summary
Installing a metal roof on a 2/12 pitch is an investment in durability and peace of mind. While the low slope presents unique challenges, these can be overcome with meticulous planning, the right material choices, and unwavering adherence to best practices. From selecting a robust standing seam system and employing full-deck self-adhering underlayment to executing precise flashing details and ensuring adequate ventilation, every step contributes to the roof’s ultimate performance. By committing to these essential guidelines, you ensure your metal roof provides superior protection, exceptional longevity, and lasting value for decades to come.
Metal Roof 2/12 Pitch Installation: Estimated Cost Factors Table
Please note: These are estimated ranges and factors. Actual costs vary significantly based on geographic location, material brand, specific roof complexity, labor rates, and current market conditions. Always obtain multiple quotes from qualified local professionals.
| Category | Description | Estimated Cost Factor (per sq. ft. of roof surface) If
